
A small app for collecting drawings in real time. Runs on a small express server that connects sources (where to draw) and destinations (where to display) via websockets.
Setup
Clone the repo , move to the directory and install the dependencies using your favourite package manager (npm, yarn, etc.).
Note that to run the app you will need to install Node.js, either on your machine or on a VPS.
For example with npm:
git clone https://git.xpub.nl/kamo/drw
cd drw
npm install
To start the application run
node server.js
or in alternative
npm start
Then open your browser to localhost:3000 and there you can draw.
If you open another tab and navigate to localhost:3000/destination, there you will receive the drawings.
This destination page is just an example! The app is meant to be open-end, meaning that the destination of the drawing is up to you! Originally it was coupled with vvvv, but it can be implemented with any platform supporting the websocket protocol (the browser, pure data, max, touch designer, p5js, etc).
How does it work
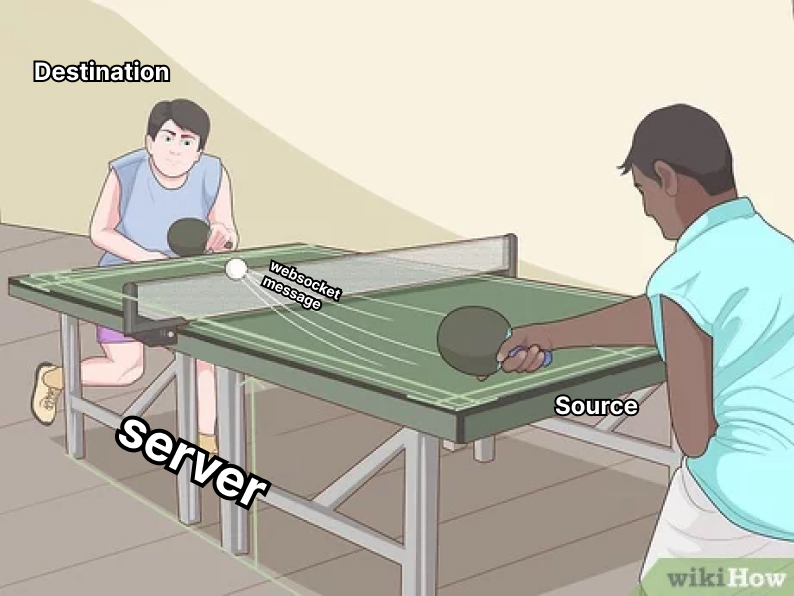
This app works like the game of ping pong. Two (or more) atlethic players connect to a server to exchange messages through the fast ball of Websocket.
There are four main elements in this app:
Source
A source is a client that connects to the application in order to send drawings. To connect as a source simply connect to the server.
This is what happens when you visit the drawing page.
For an example, look at the script section in the views/index.html file in the folder.
Destination
A destination is a client that connects to the application in order to receive drawings. To connect as a destination, greet the server with an hello message:
{"type": "hello"}
This is what happens when you visit the destination page. For an example of the code, look at the script section in the view/destination.html section. Right after opening the websocket connection, the script will send a greeting to the server.
Websocket Messages
Websockets are a type of connection especially suited to real time application.
Here they are small JSON messages of different types. Imagine it as small Javascript objects or Python dictionaries
{
    "type": "test",
    "data": "hello this is a test message!"
}
Here they always come with a type property, that is used in both server and clients to trigger specific functions depending on it.
At the moment the app logic is built on these messages:
-
hello
register the client as a destinationexample:
{"type": "hello"} -
drawings
message that contains SVG path of a drawingexample:
{"type": "drawings", "paths": "M 10 10 H 90 V 90 H 10 L 10 10"}maybe should be renamed just drawing
-
theme
message that suggests to the player a theme to draw aboutexample:
{"type": "theme", "theme": "animals"}
Server
The server is the table that grants to the connected clients to exchange messages. It mainly takes care of keeping track of who is connected, and to send the right message to the right client. For an insight of how does it work look at the comments in the server.js file!
Going online
Eventually you want to put online your drawing app.
To be able to use this app on the Soupboat (or other servers connected in the hub.xpub.nl ecosystem) some additional configurations are needed.
Note that the following details are tailored to the particular case of our server. Other instances could require different setups.
This is one possible workflow.
Clone the repo and install the requirements as you would do locally.
git clone https://git.xpub.nl/kamo/drw
cd drw
npm install
Environmental variables
There are a couple of environmental variables to set: one refers to the port where to mount the application, the other is related to the prefix to add to the application urls.
nano .env
Will create a new .env file where to add the values for this specific environment.
In the case of the soupboat, for example:
PORT=3000
PREFIX=/soupboat/drw/
Save and exit.
The port is where Express will mount the application. This is by default set to 3000, but in this case we need to pick a port not already in use. When deciding which port to use, check your NGINX configurations file (see next section), or simply test if the port you want is already in use.
sudo lsof -i:3000
For example, will print the process currently using the port 3000. If nothing is printed out, then the port is available.
Read more about it here: Check if port is in use Linux
The prefix variable is a way to deal with the hub.xpub.nl ecosystem. Here our base url is hub.xpub.nl. Notice that is missing the /soupboat/drw/ part.
The deal of the prefix is to leave out from the code these parts of the address, that otherwise should be repeated in every url and navigation element of the app.
This also make the code a bit more portable, meaning that you can test it locally and online without messing around with the urls in the code.
The app is written in order to provide some default values if an .env file is not found, and that's why it works locally even without specifying any environmental variables.
NGINX Configuration
To make it works behind a reverse-proxy open the NGINX configuration file
sudo nano /etc/nginx/sites-available/default
and inside the server section add a new location:
server {

    #note that your configurations may differ!
    listen 80 default_server;
    listen [::]:80 default_server;

    root /var/www/html

    # ADD FROM HERE
    location /drw/ {
        proxy_pass http://localhost:3000/soupboat/drw/;
        include proxy_params;
        proxy_set_header Host $http_host;
        proxy_set_header Upgrade $http_upgrade;
        proxy_set_header Connection "upgrade";
    }
    # TO HERE
}
The lines that you should edit according your configurations are:
location /drw/
The name of the location /drw/ is up to you, and it's the address where the app will be served. In this case will be hub.xpub.nl/soupboat/drw/.proxy_pass http://localhost:3000/soupboat/drw/;
The very same name, as well as eventual prefixes, need to be specified in the line of proxy pass. The port, in this example set to 3000, it's the port where Express is mounting the application. By default is 3000, but you can edit it according to the configurations of the express server.
The three proxy_set_header Host, Upgrade and Connection are necessary to make the Websocket connection work.
Once you add these info save and exit. To check that the NGINX configuration file is ok run
sudo nginx -t
If it prints that everything is fine, reload nginx to apply the configurations. If there are errors instead reopen the configurations file and fix them!
Watch out: reloading nginx when the configurations are broken means disaster. Always run the test before reloading!
Then you can start the app as you would do locally.
node server.js